
Garden tools are essential companions for every gardener, helping to cultivate and maintain a beautiful and thriving outdoor space. However, over time, these tools tend to dull due to regular use, reducing their effectiveness and efficiency. Sharpening your garden tools is a crucial maintenance task that ensures clean cuts, minimizes effort, and maximizes results. In this article, we will explore the art of properly sharpening garden tools, providing you with step-by-step instructions and valuable tips to keep your tools in top condition.
Step 1: Gather Your Tools
Before embarking on the sharpening process, gather the necessary materials. You will need:
Safety goggles: Protect your eyes from flying metal fragments during sharpening.
Heavy-duty work gloves: Ensure your hands are shielded from potential accidents.
A metal file or sharpening stone: Choose a file or stone appropriate for the specific tool you are sharpening.
A wire brush or steel wool: Use these to remove rust and debris from the tool’s surface.
A lubricating oil: Apply a light coat of oil to prevent corrosion after sharpening.
Step 2: Clean the Tools
Inspect your garden tools for dirt, rust, and any other debris. Use a wire brush or steel wool to clean the surfaces thoroughly. Remove any rust spots by scrubbing gently until the metal appears clean. Once the tools are free of dirt and rust, rinse them with water and allow them to dry completely.
Step 3: Determine the Sharpening Angle
Different garden tools require different sharpening angles. For tools like shovels, hoes, and spades, a 45-degree angle is generally suitable. Pruning shears and hedge trimmers, on the other hand, typically require a narrower angle of 20-30 degrees. Research the recommended angle for the specific tool you are working with, as this will ensure optimal results.

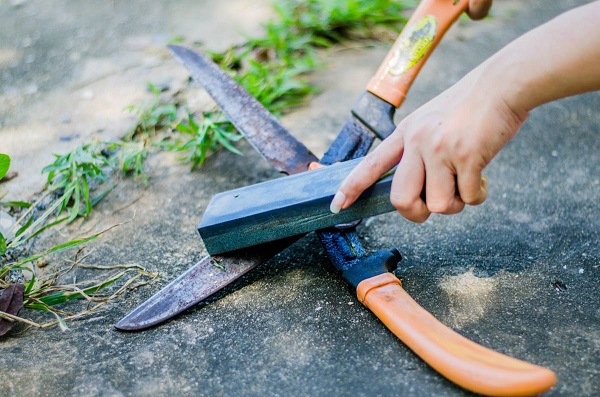
Step 4: Begin Sharpening
Hold the tool securely in one hand, ensuring the cutting edge is facing away from you. With your other hand, firmly hold the file or sharpening stone and position it at the desired sharpening angle against the beveled edge of the tool. Use smooth, controlled strokes to push the file or stone away from you, working in one direction along the entire length of the blade.
Maintain a consistent pressure and avoid using excessive force, as it can damage the tool. For tools with curved blades, such as pruning shears, use small circular motions to match the contour of the blade. Repeat this process until you achieve a clean, sharp edge on the tool.
Step 5: Test the Sharpness
After sharpening, it’s essential to check the sharpness of the tool before putting it back into use. Use a piece of paper or cardboard to perform a quick test. For cutting tools like pruning shears, try making a clean cut on a small branch or stem. If the tool does not perform as desired, repeat the sharpening process until the desired sharpness is achieved.
Step 6: Oil and Store
Once you are satisfied with the sharpness of your garden tools, apply a thin layer of lubricating oil to the metal surfaces. This prevents corrosion and maintains the tool’s cutting efficiency. Store the tools in a dry place, preferably hung on a wall or rack, to prevent them from coming into contact with moisture.
Conclusion
Sharpening your garden tools is an essential practice to ensure their longevity and performance. By following the step-by-step instructions outlined in this guide, you can restore the sharpness of your tools and enhance your gardening experience. Remember to prioritize safety by wearing goggles and work gloves during the sharpening process.
Related Articles & Free Email Newsletter Sign Up
How to Extend the Life of Your Tools
Inexpensive Tools and Materials Every Small Greenhouse Grower Should Have
Maintaining Garden Tools: 8 Tips for Longevity and Efficiency
Subscribe to our Free Email Newsletter

Comment here