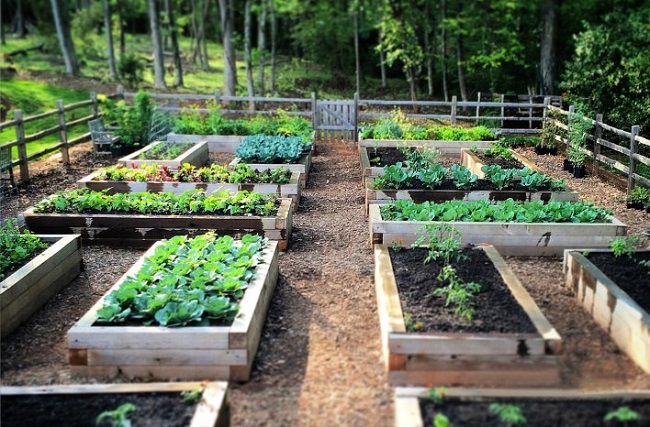
It is the rare gardener indeed who moves into a house with great soil. In fact, many gardeners believe that it takes up to seven years to “amend’ most soil to the point where it is premium for growing great gardens. In gardening with raised beds, we have the distinct advantage of being able to start with at least a few inches of perfect soil. Raised beds also help to add a neat appearance and structure to the garden. In addition, they eliminate the need for tilling because soil in the planting beds is not walked on and compacted.
The Secret is in the Soil
Now days many gardeners go to the store and buy dirt for containers or raised beds. If they get the right stuff, it is technically not dirt, but a combination of other innate and organic substances. Smart gardeners know that they can’t just trust one bag of soil for superior raised bed gardening and go to a little extra trouble to prepare the beds that saves time, money, and headaches.
Adequate Drainage and Water Holding Capacity
Perhaps the most critical factor for soil preparation is ensuring adequate drainage. If sufficient nutrition is not present in the soil it can be added, and if the soil does not hold water well it can be watered more frequently, but if it has poor drainage, it will be difficult to grow most plants successfully.
It is for this reason that you need to add perlite (high-fired volcanic rock) and sand to the raised bed soil mixture along with other organic amendments that improve the soils nutrient content, water holding capacity and drainage. The goal is to create a “living” soil that encourages microscopic elements that have a symbiotic relationship with one another. This includes bacteria, amoeba, protozoa, and fungi. These elements consume organic matter and in turn give off effluent called humus. Humus is small enough that it can be absorbed by plant roots.
A good soil has both great water holding and drainage capacity. “Water holding” and “Well draining” may seem like opposites, when in fact they are not. A good soil holds water by having components that can absorb water and release it to the roots over time when needed. It also has components that will allow gas exchange (oxygen and carbon dioxide) and excess water to drain out.
Preparing the Location for a Raised Bed
After selecting a location for the raised bed that has the desired sun exposure for the type of garden planned you will need to clear the area of all weeds and grass. Some people use a nonselective herbicide like Roundup to kill vegetation before removing. Another option is to smother the weeds or grass with black plastic for a couple weeks and then till them in with other amendments.
A bed that is 4×8 feet and 6 inches deep is a desirable size because it allows one to work the beds from the side without needing to step in them. If beds are placed side by side make sure to leave ample room for traffic and working in the garden. Generally, 3-4 feet between beds works well.
The next concern is to help the location to have sufficient drainage and to add some nutrients for deep roots that penetrate below the soil of the raised bed. For each 4×8 bed, mix or till one 5-gallon bucket of dry grass clippings (the merits of which will be discussed below) and the same amount of builder’s sand. Set your wood bed frame on top of this prepared area rather than burying it. This will leave 5 inches for adding perfect soil in the next step.
Preparing the Topsoil
The soil we want to create is not dirt. It’s a living, breathing entity with billions of bacteria, which plants attract to their roots. They live in the water-filled pore spaces between soil particles and around decaying plants and animals which the convert into chemicals like nitrogen in a form that plants can use.
Mycorrhizal Fungi also work hand in hand with plants by colonizing and expanding their root systems into the surrounding soil. A bit further up the chain of soil-born life are the protozoa, feeding on the bacteria and fungi, then nematodes, earthworms, and countless arthropods, such as springtails, sow bugs, beetles, and ants. They shred organic material into smaller pieces, graze on bacteria and fungi, excrete nutrients and enhance the soil by burrowing and mixing it, changing its density and porosity. The following components make an excellent mix and top dressing.
Compost
In the absence of your own compost, it is best to buy 3-5 different brands and mix them to try to come up with a more complete and balanced compost. Compost serves to add organic matter to the soil that will break down slowly over the growing season and help to feed the garden.
Sphagnum Peat Moss
Sphagnum peat moss is a natural, organic soil conditioner that regulates moisture and air around plant roots for ideal growing conditions. It retains up to 20 times its weight in moisture, and releases water slowly as plants need it. This capillary action helps to reduce the leaching of nutrients from the soil. Peat helps to keep soil from hardening and adds additional organic matter that will slowly break down into nutrients. Peat moss decomposes slowly over several years compared to compost which typically decomposes within one year. It has a reliable pH (3.4 to 4.8); is environmentally friendly and free of insects, weeds, seeds, salts, and chemicals.
Sand
Sand is used to help with drainage and is very inexpensive insurance for good drainage. It eventually works its way down through the soil, works well in the starting mixture, and by the time it has worked its way down past the bottom of the bed the plants roots are more fully developed and help to break up the soil.
Perlite
Perlite granules contain many small air pockets making the product very light which helps soil with drainage and gas exchange. It is inorganic, sterile, safe to handle and has no odor.
Coffee Grounds

Coffee grounds are one of the best kept garden secrets, and thanks to Starbucks they are available free in large quantities. Starbucks packages the grounds in used coffee bags and has them available free for the asking. According to Starbucks most of the acidity is removed, leaving used grounds with an average PH of 6.9 and a carbon-nitrogen ratio of 20-1. Make it a point to map out the Starbucks on the way to work and stop in each day, not only for a cup of coffee, but for a bunch of free grounds that will do wonders in the garden.
Grass Clippings
Grass clippings are one of the best organic fertilizers. Not only because it’s easy to find free local sources, but also because the clippings do double duty preventing weeds and conserving soil moisture when used as mulch. The best clippings to use are from less than perfect lawns that have not been sprayed with pesticides/herbicides or over fertilized. The secret to using grass clippings is to spread them out on the ground to dry and then rake them back up for using as a much and/or mixing in soil.
Filling the Bed
The best way I have found to mix soil components takes two people. Get a large tarp and spread it out on the ground. Add the components, but not so much that it is hard for two people to lift the tarp with the soil. First pull one side of the tarp over the top until the soil is just about to spill out the other side. Do this with each side in rotation until the soil appears to be well mixed. Then the tarp can be easily used to move the soil into each bed.
The mix should consist of:
1 part peat moss
1 part compost
1 part sand
1 part perlite
5 lbs Coffee Grounds for each 4×8 bed
Top Dressing
Once the beds are filled with the soil mix, place a layer of newspaper three sheets thick and quickly wet the paper with the hose to keep it from blowing away. Over this I put a layer of dry grass clippings about two inches deep. Water the grass by spraying it for a few days to keep it from blowing around and to help start the decomposition process. Then switch to drip irrigation if available. Now you are ready to plant!
Kept moistened, the newspaper will quickly decompose and when the grass comes in contact with the soil there will be a lot of biological activity. This means that in the top half inch of soil the microscopic life is consuming the organic matter and in so doing is enriching the soil. The enrichment goes deeper than that as earthworms and invertebrates get involved plus watering will carry the nutrients deeper into the soil.
Just remember that the root of all successful gardening is the soil. Your time and effort in getting the initial soil right will make things easy for the duration. In preparation for each new growing season just add a couple inches of dry grass clippings. Cover this with a couple inches of compost for planting and then a couple weeks after planting top-dress with a few pounds of coffee grounds for each bed. Two months into each growing season, I recommend fertilizing with a good fish emulsion seaweed blend and this is all the fertilization you should need.
Nick Fraser is a free-lance writer and gardening enthusiast.
Related Articles & Free Email Newsletter
Be a Worm Farmer and Make Your Own Compost
How to Have Great Compost in 3 Months
pH? Widely Used, Little Understood
Subscribe to our Free Email Newsletter

Comment here