People who grow plants are touted as having a green thumb. Those who kill plants think the green thumbs know magical secrets that keep their plants alive. We definitely know things, but they are not magical. We know that plants need water, need fertilizer, and the right amount of light. Lastly, we know that plants need to be repotted. I have found that if people are killing plants, they are watering incorrectly or are not repotting a plant. Knowing when and how to re-pot a plant can be a little confusing but this article is aimed at demystifying the problem.
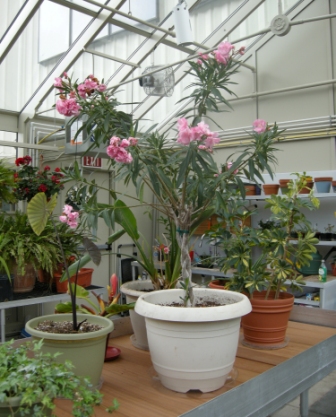
I always seem to have several plants that need to be re-potted. Each plant grows at a different pace but all will eventually need a larger container. There are three tell tale signs that a plant has reached their limit, and all are seen through the leaves.
Dead Leaves
Dead leaves are an obvious sign. When the leaves start dying, there is definitely something wrong. Chances are good that there is not enough space left for growth. The roots are growing too large for the container and are choking out nutrients. Mold can grow in the container. Pests will also grow with a pot bound plant. A lot of times, the plant becomes so large that it becomes top heavy, and the container will fall.
Yellow Leaf
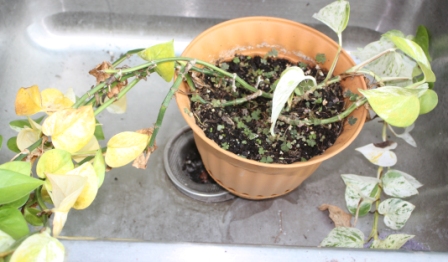
Another leaf indication is a yellow leaf, as shown in the philodendron and oleander. This seems to be the most prevalent sign in my greenhouse. As the leaves turn yellow I know something is wrong. It has come to the point where I automatically check the roots. I have found that the majority of my plants need re-potted once a year. My faster plants will require twice a year, and the slow growers about every year and a half. If there are yellow leaves, and it has been a year since the last transplant I know it is time again.
Just Does Not Seem Healthy
The last sign that it’s time for a new container is when a plant does not seem healthy. There are no dead leaves yet, but it lacks luster and may have stopped growing. I have a picture of ivy that looks sick. For several months the ivy grew, was healthy and bright green. Then it stopped growing and the color started to fade into a yellow green. I fertilized and still it did nothing. My next remedy was to pull the plant out of the pot and see how the roots were doing. Sure enough, my ivy was pot bound.
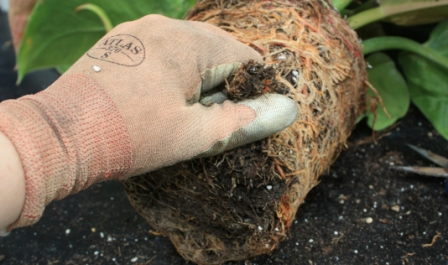
A root bound plant has exposed roots, tightly bound. A healthy plant does not have this. After you discover that the plant is definitely pot bound, it is time to free her. I am going to walk through the process with pictures of a philodendron that was in desperate need of a new container. It was a year and a half since this plant had last been potted. The roots were incredibly and tight and growing into each other.
When you re-pot a plant, you should pick a container that is 4-6” larger than the current one. So if your plant is in a 6” container, you should find a 10-12”, which was the case with my philodendron. The extra space will allow the plant to grow larger. There are several types of containers on the market today: terra cotta, ceramic, plastic, metal and recycled content. Each one has benefits, but any type of container will suffice.
Terra Cotta
Terra cotta is the classic choice. It is available in virtually every size and has an attractive appearance, which is reminiscent of classic gardens. The drawback to terra cotta is that it will break very easily, the larger sized containers are heavy, and water is soaked up very quickly.

Ceramic
Ceramic containers are beautiful. They come in every color and shape, and many have unique glazing patterns. A ceramic container will add a burst of color to the greenhouse or garden. If you are looking for a modern looking container, a ceramic one will probably be the best source. This container type is my personal favorite, though I have cut back on buying the large ones because they are so heavy. Another problem with ceramic containers is the cost. A glazed ceramic container will be the most expensive out of every container type.
Plastic
Plastic containers are the least expensive. There was a time when I saved every plastic container a plant came in from the nursery, and over time, I accumulated way too many. These containers are free and easy to use for a quick re-potting. Color selections are limited, usually black, green, an orange to mimic terrace cotta, brown and white. I noticed this past summer that a lot of chain stores were coming out with colorful plastic containers that were somewhat attractive. The chain stores also carry resin based containers which are a plastic material, molded to look like a high end container available in an assortment of colors, and are light weight. Plastic containers are always light weight and do not absorb nearly as much water as a terra cotta container. Many plastic flower pots can be recycled and I have also found a number of nurseries which are accepting returned containers.
Recycled Content and Metal
Last on the list are recycled content and metal. The green movement is very popular in the gardening world and so recycled content containers are being manufactured. A lot of these pieces are neutral colors, simple shapes and limited to smaller sizes. Many are made out of bamboo, oil, and natural fibers. They are supposed to degrade quicker than a plastic container. Metal containers are not easily found. I only have one metal container which I bought several years ago. They can be light weight, or extremely heavy depending on the metal type and thickness. Some will rust with time, while others are made of aluminum or stainless steel which does not corrode. As I said before, any container will work for a root bound plant; the flower just wants more space, regardless of the container material.
The first thing to do when re-potting a plant is to ensure there is adequate drainage in the container. Overwatering will kill a plant, so water needs an escape. Most flower pots come with a drainage hole in the bottom. I, however, do not like just one hole. Every plastic flower pot I buy gets multiple holes drilled in the bottom. Containers with solid bottoms, or terra cotta pots that only have one hole, are given additional help. I use rocks, broken flower pots, packing peanuts and even soda cans in the bottom of a container to help with drainage. Many people are shocked by the soda cans but they are made of aluminum and do not rust. The same is true for packing peanuts which are a plastic base material and do not break down quickly. I also add a coffee filter at the bottom of the container, a trick I learned from my mom. The filter keeps the soil in the container, not on the floor, until it has compacted.
Next I start on the plant itself. The roots need to be loosened so that the plant can continue to grow. If the roots are not freed, they will continue to grow in circles, instead of reaching out to the new soil. There is no rhyme or reason; I just loosen all the roots, until everything is nice and “floppy.”
Fresh potting soil is placed in the container, a couple inches deep before the plant. I usually add a granule fertilizer and pesticide at this point. Then the plant goes in and soil is added around, until the container is full. I always pat the soil, to make sure the plant is fully secured. The top of the plant should be about an inch or two lower than the container’s sill. Step back and make sure the plant is level and not leaning to one side, which often happens if materials are placed in the bottom of the container for drainage. Give the plant a good drink and she should be good to go.
In the next day or two the soil will settle and in a few weeks you will probably see new growth.
Lyndsey Roth is an experienced gardener and greenhouse grower.

Comment here