
Everybody wants a nice lawn, but keeping your lawn looking nice year after year takes time, effort, and a little expertise. There are a couple of easy pre-winter lawn repair tips that work really great so your lawn is off to a flying start next spring.
If your lawn is a nice thick, seamless bed of deep green turf, you are lucky. And I’ll bet that you also spend a great deal of time and energy keeping it that way. Many people don’t have a lawn like that, but would like to have such a lawn. However, try as they might, it just never happens. So hopefully my easy pre winter lawn repair tips will make a difference.
If you have broadleaf weeds in your lawn those are easy enough to get rid of using any one of the products for lawn weed control that are available in discount stores, hardware stores and garden centers. But the one thing that is not easy to get rid are thick bladed grasses that make your lawn look coarse and kind of like a cow pasture.
The reason these thick bladed grasses are more difficult to deal with is because they are grasses, not broadleaf weeds. Most lawn care products are designed to kill broadleaf weeds, but not the grass. Thick bladed grasses might look ugly in your lawn, but they are still in the grass family, and therefore weed control products won’t harm them.
So here’s how I deal with thick bladed grasses and other undesirable grasses in my lawn. I should also point out that some people have a problem with creeping bent grass taking over areas of their lawn. The pre winter lawn care tips that I’m about to show you will work on creeping bent grass as well as thick bladed grasses. Just follow the same procedure explained here.
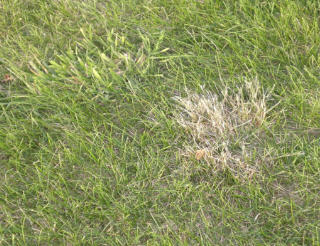
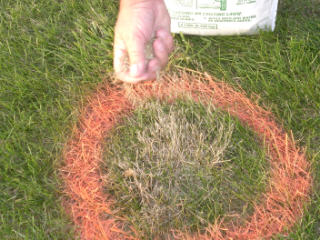
Step one is to first locate and mark the clumps of thick bladed grasses that you want to get rid of. In the above photo you can see a clump of thick bladed grasses, and a clump of coarse grass that actually shreds when the lawn is mowed and it looks bad. Mark both of these clumps with some orange paint.
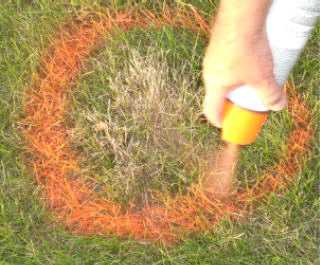
This is a can of inverted marking paint that is designed to work when turned upside down. Regular spray paints don’t work when you turn them upside down. You can buy inverted spray paint at most hardware stores. They are used a lot by contractors.
The reason to mark the areas with paint is because you are going to spray the undesirable grass with Roundup and having a painted boundary will keep you in line and only spraying the areas inside the painted circles.
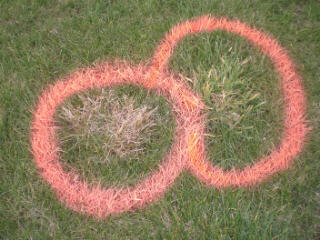
In this photo you can easily see how different and obvious the two areas of grass that need to be eliminated are.
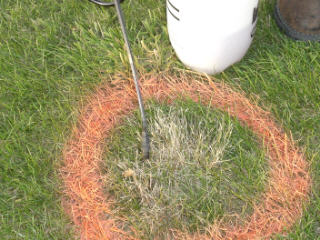
Once the circles are marked out then go back and spray just the areas inside the circle with Roundup. Notice that I am using a pump sprayer. Make sure that if you use a pump sprayer you use one that is only to be used for the purpose of spraying Roundup. Mark on the sprayer that it is only to be used for Roundup. Keep in mind Roundup is a non selective herbicide and will kill or seriously damage any grass or plants that it touches. Please read the instructions and the warnings on all products you use.
Be careful that you don’t allow the spray to drift to areas outside of the circle. Do this by only pumping the sprayer just enough to push the product out of the sprayer, but not under high pressure. Adjust the nozzle on the wand so the spray pattern is narrow and the droplets of spray are larger and heavier. If you use a wide spray pattern and pump the sprayer up to maximum pressure the spray is atomized and is very light and will easily drift away from where you want it, damaging areas of your lawn that you intend to save. If you use a narrow spray pattern and low pressure you will be able to easily control where the spray goes.
When spraying Roundup you only need a small amount for it to work correctly. More is not better! All you have to do is dampen the foliage with the spray. If you spray to the point of run off, you are applying too much.
In cooler weather it can take Roundup 7 to 10 days before you even notice the grass turning brown, maybe longer. Don’t be concerned about how long it takes to work. f you sprayed it, it will work. The grass should remain dry for 24 hours after spraying or the spray could be washed off.

After you have sprayed the areas inside of the circle wait 72 hours to make sure the Roundup is completely dry and has been absorbed by the undesirable grasses that you want to eliminate. At that time you should sprinkle grass seed over the areas that you sprayed. Make sure to seed to the outside edge of the circle to make sure you put grass seed everywhere that you sprayed Roundup.
That’s all there is to it, you are done! No digging, no chopping, no tilling, no making a mess of your lawn, just paint, spray and seed.
After about 10 days the areas that you sprayed will turn brown and not look very nice, but by then the grass seed should start germinating. If you do this early in the fall the grass seed will germinate much quicker and will already be growing by the time the old grass completely dies out. But later in the season it will take the grass seed a great deal longer to come in, but by spring you should see plenty of new grass in the areas that you spray. If you don’t see new grass by early spring just sprinkle some more seed over the areas.
Tips on Buying Grass Seed
This is important because a lot of people mess this up, and the stores set you up for failure. All grass seed is not created equal. Here in the northern climates we have what are considered cool season grasses. A good blend of cool season grass seed would be a blend that contains Kentucky blue grass, at least one or two types of perennial rye grass and one or two types of fescues. You should always use a blend of grass seed and never use just one kind of grass seed.
Kentucky blue grass is very slow to germinate and can take up to 28 days or more to germinate. That’s too long. In 28 days all kinds of weed seeds will germinate long before the Kentucky Blue. So by using a blend of grasses, the perennial ryes can germinate in as few as 6 days and actually act as a nurse crop protecting the Kentucky blue grass seeds until they can germinate. But you want Kentucky blue grass because it is fine textured and is not susceptible to some of the pests that attack rye grasses.
But you have to be careful what you buy. There is a lot of cheap, low quality grass seed on the market. The seed itself is fine, but the grass that it produces is not what you want in your lawn. If you want a nice lawn don’t buy cheap grass seed. The more you pay per pound for grass seed the higher the quality of the grass it produces. You don’t have to buy the most expensive, but close to it.
For instance, one bag of seed might contain a blend like I described above. The bag next to it might contain a similar blend, but at a higher price. The difference is usually the texture of the grass. All perennial rye grass is not the same. Some of it has a much finer texture and looks every bit as nice as Kentucky blue grass. The more expensive blend will contain better varieties of perennial rye grass. The less expensive blend might contain some annual rye grass. You really don’t want annual rye in your lawn. At least I don’t think you do.
Mike McGroarty is the owner of McGroarty Enterprises and the author of several books. You can visit his website at Freeplants.com and read his blog at Mikesbackyardnursery.com.
Related Articles & Free Email Newsletter
Proper Mulching is One of the Best Things You Can do for Your Plants
Understanding Grass Seed Germination
Understanding Stressed Trees: Insects, Disease & Environment
Subscribe to our Free Email Newsletter

Comment here