Don’t you just hate to see winter on its way? The end of the rose season is always a sad time. It’s amazing though, how we adjust to our climates. Those of us in climates where winters are cold are grateful for the break in the gardening season, and gardeners in the tropical South and West just love to be able to keep their gardens beautiful for the whole year.
In climates where roses keep growing year ‘round, your plants will benefit from a period of forced dormancy at the coldest part of your year. You can force dormancy, or something close to it, by pruning your roses way, way back and removing the remaining leaves. This gives the plants a short rest which they use to rejuvenate and gather their strength for another year of fast growth and terrific blooms.
But in climates where winters are cold, roses go dormant all by themselves. The shorter days and the cooler temperatures signal the plants that they should begin going into dormancy. By mid- to late-November, cold climate roses will have completed their dormancy process, which consists of the plants shedding much of the sap in their cells, and the thickening of the cell walls. This helps prevent the sap from freezing and making ice crystals that kill the cells by piercing their walls.
In Hardiness Zones 6 and lower, many roses will need winter protection. All roses that were planted in the spring of the current need protection, even if they’re very hardy varieties. It takes a couple of years for a new plant to become really established in your garden, so don’t take any chances, and provide some protection for this winter. In future winters, the tough roses may not need any protection al all.
Hybrid tea varieties are not as cold hardy and always need protection, and while shrubs, floribundas, and miniature roses are generally hardier than the teas, they may need at least a layer of good mulch with some leaves or wood chips.
Once the plants have been in your garden for a couple of years, you’ll have a better idea of how much, if any, protection your plants need.
It’s not the cold that kills rosebushes, it’s the drying winter wind and the cycles of freezes and thaws that happen repeatedly throughout the winter. So, the object of winter protection is to keep the plants consistently cold. Believe it or not, the soil temperature, where the roots are, doesn’t go much lower than 22 to 24 degrees, so the roots of plants in the garden will be fine. It’s the above-ground parts of the plants that we must be concerned with.
You can always count on the tops of the canes of most roses dying back, but if the bud union and the lower several inches of the canes are covered, they’ll be protected. In the spring, you may have to cut the canes back substantially, right back to the nice green wood that was under your winter protection materials, but that’s okay. The plants will start growing fast, and they’ll be bigger and healthier than they were the previous year. Roses love to be pruned. It encourages lots of new growth.
Once the plants are completely dormant, in mid- to late-November, it’s time to apply your winter protection materials. Roses aren’t pruned in the fall unless the canes are so tall that the wind will rock the plant and damage the roots. If you must cut back very tall canes, do it when the plants are dormant. Pruning earlier can encourage the plants to start producing sap again on warm days.
The best and cheapest way to protect your roses is with soil, mounded over the base of the plant. This adds more protection for the bud union, which in cold climates should always be planted below the surface of the soil, and it covers the lower few inches of the canes, protecting them from the wind and the freezes and thaws.

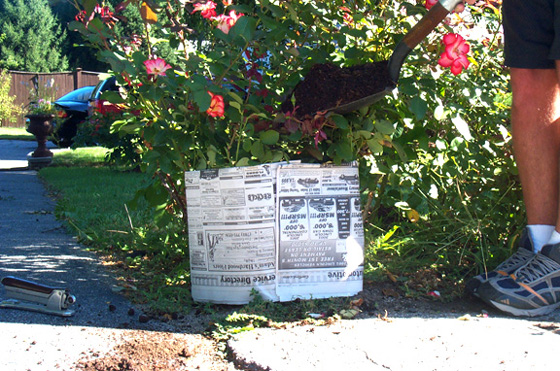
If you’ve tried mounding soil over a plant, you will have noticed that the mound tends to spread out, making it wider, rather than taller. So, a collar of some sort, placed around the base of the plant works great to keep the soil where you want it. The cheapest material to use as a collar is newspaper, which can be thrown away in the spring.
Use three or four sheets of regular-sized newspaper folded horizontally to make a component. The collar will stand on its edge around the dripline of the plant, so most roses will require two components, stapled together, but a wide rosebush may require three components stapled together. Place the long strip of two or three components around the base of the plant and staple the two ends together. Voila! A newspaper collar.
Before you add soil to fill the collar, make sure you remove any leaves that may be remaining on the parts of the canes that will be under the soil mounds. These leaves will rot under the soil and cause diseases that may attack the covered canes.
The collars will withstand winter rain and snow, although they’ll be unattractive come spring. But when you remove them in mid-April, you’ll be amazed at the new shoots that will have begun growing under the soil!
Ann Hooper is a certified American Rose Society Consulting Rosarian.
Related Articles & Free Email Newsletter
A Miniature Rose Prospers Outdoors
How to Extend your Vegetable Harvest into Winter
How to Grow Effectively in a Greenhouse Year-Round
Subscribe to our Free Email Newsletter

Comment here