Gardeners tend to become borderline obsessive with seed starting, especially those with a greenhouse. The beauty of a greenhouse is the fact that you can start your seedlings year-round. No longer are you limited to February and March. This year I started seeds in winter, so I had something new to look at in the greenhouse. The excitement of a seed that has sprouted is cause for great celebration. My seed obsession is a continual process which is especially strong in spring and winter. Around Christmas I start pouring over my seed catalogs and decide what I want to grow the next season. Then in January I order my seeds and start my cool weather crops in late February or early spring. At the end of April, the summer vegetables are started. The rest of the year I grow whatever I am in the mood to see growing.
My greenhouses grow only heirloom seeds. This type of seed usually has three qualifications.
- The variety has been in existence for over fifty years, many times handed down through generations.
- The seeds are open pollinated, meaning the seeds can be harvested from a plant, saved over winter, planted in the spring and the same plant will grow next year.
- The seeds have not been genetically modified for qualities like high yields and disease resistance.
I personally like to buy from the small, privately owned seed companies and that usually means they cost a bit more. I can find a pack or regular seeds at a big box store for under $2 and heirloom seeds will range from $2 to $4 more a pack. In order to offset the seed cost, I developed creative containers. The first way is to keep all the black plastic 4 and 6 packs from spring annuals. Normally these containers end up in the trash or recycling, but I keep them. They are the perfect size for seed starting and the pods fit into a standard 10” x 20” seed tray, which I save if I buy a flat of flowers in the spring.
Plastic food containers are readily available and very easy to use for seed starting. My personal favorite is a yogurt cup. Pill bottles and spice containers are also the perfect size. Make sure to thoroughly wash the container and then poke a hole into the bottom for drainage. If I have the right seeds, I will match my yogurt container to the variety. For example, Cherry tomatoes go in a cherry yogurt cup and banana squash will be raised in the strawberry banana cup.
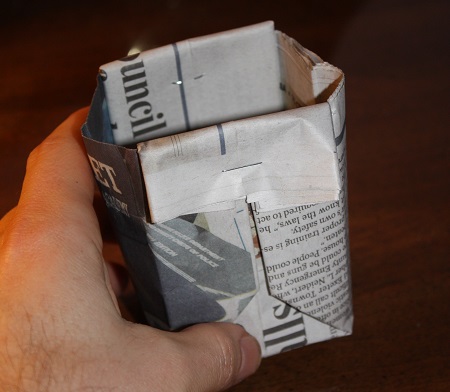
My next inexpensive seed starter is a newspaper pot. This is an old method, used long before black plastic containers came to the market. I have an aunt who still uses newspaper pots. Most people have a newspaper somewhere in their house or can easily buy one at a newsstand. You fold the newspaper into a 3” strip and then roll the paper around a perfectly round cup (glasses with stems or indents will not work). Finally, you fold up the bottom of the newspaper to form the base of the container and tape the side. Fill the pot with soil and plant your seeds. The entire newspaper pot and plant can be placed in the ground during transplant. A more creative method, and that is a fun project for children, is to create an origami newspaper pot. This method involves numerous turns and folds with plenty of online tutorials available for the activity.
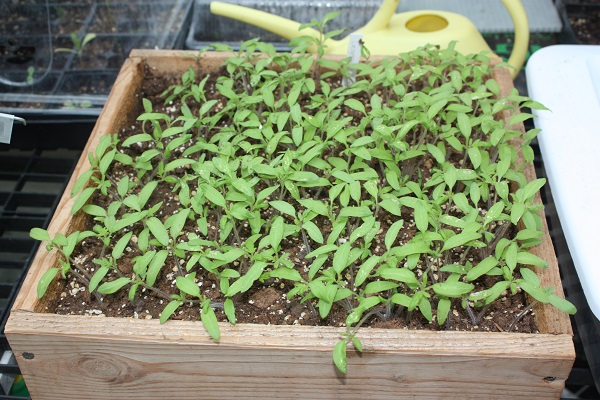
My next method comes from a retired farmer. He has never started a seed in anything made from plastic. He told me that growing up on a farm as a child he started seeds using a shoebox filled with dirt. This was sufficient for the seeds though the box tended to become flimsy and disintegrate. The solution to this problem was to build a box out of wooden 2 x 4’s. You can create any size box as long as it has a bottom and four sides. The box is filled with potting soil or compost and instead of starting the seeds in a line; he simply tossed the seeds in the container covering the entire box. There was no order, and when the plants grew, there was no thinning. I had always been told to grow one seed per container because you eventually must thin. The farmer’s seeds were always fine and when it was time to start the outside garden the seedlings were simply separated and placed into the ground. The wooden box can be saved and re-used for several years.
Biodegradable pots are my last method and the costliest. The basis of this container is a seed pot that is made from materials which are safe to put in the ground. There are countless different varieties on the markets. There are Jiffy Pots that ship to you in 2” wide by ¼” tall flat circles. The small piece is submerged in water for about twenty-four hours and a four-inch-tall pod emerges. The Jiffy pot is wrapped in a white material, kind of like a netting or cheese cloth. You plant the seed directly in the pod and allow the seedling to grow. In the spring the entire pod is transplanted into the ground which means less shock for the plant.
You will undoubtedly have access to one of these methods. Start your seeds in spring, summer, winter or fall. Enjoy the cost savings and the blooms, vegetables and fruits that come with your harvest.
Lyndsey Roth is an experienced gardener and greenhouse grower.
Related Articles & Free Email Newsletter Sign Up
How Rooting Compounds Work and Why You Need Them
How to Make Your Own Seed Starting Mix
Tips to Get Seedlings Off to a Fast Start
Subscribe to our Free Email Newsletter

Comment here