Starting vegetables from seed is the first step to growing your own food. Watching seeds grow is also an educational adventure in which everyone should participate. Each time you start a seed, you get to witness the amazing transformation that takes place when you add a little water, light and warmth. It’s truly a miracle to see how tiny, dry seeds sprout into vegetable seedlings and then grow steadily into edible plants and plants bearing fruit.
Save and Even Make Some Money
Growing vegetables from seedlings is education and wonderment, but it’s also frugal living – vegetables help feed you. Here’s a question for you. How much food can you buy for $200? Careful now, it’s a trick question. The answer depends on where in the grocery store you decide to spend your money, right? Well, not entirely.
What would happen if you didn’t spend your money in the grocery store, but you invested it in vegetable seeds from a catalog? How much food could you grow? What would it be worth? How many seeds would you need? How long will they last? What are the savings?
When you invest in vegetable seeds, the $200 will get you an abundance of seed packets. If you focus on starting vegetables from seed, those seeds will create all the produce you’ll need for several years. Even better, all your favorite varieties will be at your fingertips. Do you like Carrots, Radishes, Turnips, Kale, Beets, Broccoli, Brussels Sprouts, or Kohlrabi? If so, you can get over one thousand seeds for a few dollars and that will provide you with hundreds of dollars’ worth of vegetables. What a nice return on investment.
If you decide to grow lots of vegetables, you may wonder what you do with so much produce? It can be canned, or you can freeze it, eat it and even dry it. Sharing it with your neighbors is always a good thing to do, or it can be sold to cover the cost of producing it, plus put some profit in your pocket while you are at it. Why not feed yourself and make some money too? Organic vegetables are commanding a high price at the store. And people are willing to pay a premium to purchase them instead of growing their own.
Collect Those Catalogs & Bookmark Those Websites
Good catalogs and websites for ordering vegetable seeds have thousands of varieties. The best for vegetable seeds provide a good description of the plant and its characteristics. In a plant description, we look for ease of growth, productivity and taste.
It is important to know this information because you want to be successful without a lot of trial and error. This is especially true if you have never tasted a particular vegetable before. To get the best idea about a particular plant, read up on the plant from several different sources. If a couple of them give a glowing report about the vegetable, then there is probably a good chance you’ll like it.
Be adventurous and try new varieties. Learn which are easy to grow, produce lots of food and provide what you are looking for in terms of taste, texture and appearance. Get a handful of catalogs and bookmark several websites for review during the winter so you’ll know what to order come early spring. We start ordering our seeds in late January. Don’t despair if you are getting a late start, there are plenty of crops that love cool weather and can be planted in the late summer for a fall or winter harvest. You can also try starting vegetables from seed packets that you obtain at local stores. They typically will have the common types of vegetable seeds that appeal to a wide range of gardeners. When ordering vegetable seeds, note on the order form that you will not accept substitutions, or you may find yourself getting substitution seeds when suppliers run out of a particular type.
Starting the Season
Our gardening season starts in February. We plant some of the early crops and longer developing ones as seeds. We use a sun room or a separate portion of the greenhouse set up just for vegetable seedlings.
Potting soil is the first important ingredient for starting vegetables from seed. You can use your own mixture of potting soil, but we find the high quality potting soils that can be purchased to be ideal. We have tried cheaper packaged soils, and found them to contain too much sand or clay. You don’t use much potting soil for starting vegetables from seed, so spending a little more for one of the high quality brands is a worthwhile investment.
Seed Starting
Once you have your potting soil straightened out, you need to get your vegetable seeds started in some sort of container. Vegetable seedlings can be started in several ways. We have tried them all, and most have both good and bad points. The following discusses the options available to the household gardener.
Seeds thrive in a good seed starting medium which is somewhat sterile. After the seeds have a good start, they can generally tolerate whatever soil you place them in. But when you are first starting vegetables from seed, you need to provide them with the best chance for success.
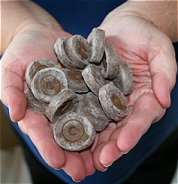
Peat pellets are good for starting vegetables from seed because they absorb and hold water well. You can start up to 72 vegetable seedlings in a standard 10 inch by 20 inch tray. They are easy to transplant into larger containers or directly into the soil where you intend to grow the vegetables.
We buy our peat pellets in bulk, more than 1,000 at a time. The pellets come in a range of sizes. We use the smaller ones for nearly everything except corn and pea seeds that are very aggressive right from the start. For them you need to use a larger pellet or better yet, try starting seed for these larger plants in a medium size pot.
Peat pellets are peat moss that has been squished flat into a wafer which is then held together by a fine mesh net. To use them, you must soak them in water to allow them to expand. This takes about 30 minutes. Once expanded, you can plant in the top center of them much like you would with soil.
Pots and Other Containers
Sheet Pots
Sheet Pots are one option for starting vegetables from seed. A sheet pot is composed of 36 small cells that are attached but can be pulled or cut apart. The entire sheet fits inside a standard 10″ x 20″ tray. These can be filled with potting soil alone, or you can place a water soaked peat pellet in each cell and then fill in around it with the potting soil.
The combination of a peat pellet and potting soil gives the best of both worlds for starting vegetables from seed – water retention by the peat pellet, and some soil for the roots to grow into.
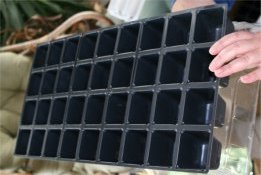
Sheet pots are the traditional way of starting vegetables from seed. The cells can be separated individually or in groups, by snipping with a pair of scissors. Sheet pots have small holes in the bottom of each cell that allow water to soak up into the soil. These holes also allow for excess water to drain out. We use sheet pots for vegetable seedlings that will be small when transplanted. For larger seedlings, we use large plastic pots.
Peat Pots
Peat pots are another way of starting vegetables from seed. Peat pots are filled with soil or a soil and peat pellet combination. The pot can absorb water from a tray or can be watered from the top like any other pot. The idea behind peat pots is that you plant the whole pot instead of transplanting the seedling. It is a good idea on paper, but hasn’t worked well for us.
We find that here in very dry Wyoming, the peat pots don’t hold moisture as well as the plastic pots and that tends to stress the seedling. And when we finally plant the seedling/peat pot combination in the garden, the edges of the pot that stick above the soil tend to wick away moisture as the wind passes by. This also tends to dry out the young plant.
Also, peat pots aren’t as permeable to roots as one might think. When we used peat pots, we had to strip away the pot just before planting to make certain there is nothing inhibiting the roots from heading out into the soil. Plastic pots offer better cost-efficiency as they last for many years, are easy to handle, and provide more moisture to the plant.
Plastic Pots
Plastic pots are a good bet for starting vegetables from seed. They work well with soil or a soil and peat pellet combination. Plastic pots can be purchased in bulk for a low cost per pot. A pot that is 4 or 5 inches tall holds plenty of soil and gets vegetable seedlings off to a great start. Plastic pots can be watered from above as you might expect, or from below by filling the tray they sit in with water and allowing it to slowly wick up through the soil. When you are ready to plant, the contents of the pot can be released easily by turning it upside down and gently squeezing the sides to release the block of soil and root system.
I like the plastic pots the best when used in conjunction with peat pellets. This is an excellent way of starting vegetables from seed. They provide a nice means of holding moisture (peat pellet) and they provide a lot of growing medium for a healthy root system (soil). The last advantage of the plastic pot is that it doesn’t collapse like a wet peat pot, and it can be used for years and years. They are rugged in nature and don’t tear or puncture like the sheet pots, plus they are a size that has a normal feel to it – about the size of a baseball or softball. They are also easy to grasp and stack nicely for storage.
Trays and Tray Domes
Standard seedling trays are a must have item when it comes to starting vegetables from seed. The trays are 10″ wide x 20″ long x 2″ deep in size, usually made from lightweight plastic. The lightweight ones work okay, but they tend to crack under the weight of the wet soil and seeds, so it is best to use the sturdier models. Using trays allows you to water the vegetable seedlings from the bottom up. Just fill the tray with water about an inch deep and the soil will absorb the water through the bottom of the pot. The number of trays you need will depend on what and how much you are going to grow, and how it will be sequenced. Even a very large garden probably doesn’t need any more than 8 trays for starting vegetables from seed.
Standard lightweight plastic trays come with clear low profile domes that work well if you are going to transplant the vegetable seedlings relatively quickly. But, if you are starting tomatoes, peppers, squash, peas, beans or corn, the seedlings will grow taller than the low profile domes very quickly and will start pushing on the clear ceiling. To avoid this problem, you’ll need taller domes, ones about 6 inches tall. They are a little pricey, but they are worth it to keep the vegetable seedlings inside a warm and moist environment while they mature. Using domes provides a little greenhouse for the vegetable seedlings. The domes hold in moisture at a steady level, which cuts down on the amount of watering you have to do, and keeps the seedlings from getting stressed. Seedlings will die very quickly if they don’t have enough moisture, and the domes work great for holding a steady moisture level.
Heat Sources
Waterbed Heaters
We have been starting vegetables from seed by using waterbed heaters as seedling heat mats. They provide warmth to the soil in the seed trays. This makes the seeds pop out of the ground just like it was June, even in the middle of February.
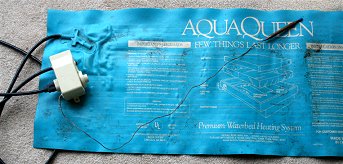
Water bed heaters can purchased online for very little money. This is much less costly than using a regular seedling heater. A regular seedling heat mat is more expensive, and it is not as versatile for keeping vegetable seedlings warm because of its limited size and low heat output.
When using water bed heaters for starting vegetables from seed, it is extremely important that you make sure the pad’s temperature bulb is underneath the seed tray before turning on the heating pad. The bulb provides feedback to the heat controller telling it that the tray above it has reached a certain temperature. If the bulb is not under the tray that is sitting on the heating mat, the controller will continue to put out heat until the mat burns out. If that happens, the water bed heater is ruined, and you will probably melt your plastic tray. Another caution is to start out on the lowest setting and see if that meets your needs for heat. The settings on the water bed heater dial are not as accurate as they might appear.
A simple and inexpensive digital indoor/outdoor thermometer can tell you whether the temperature inside the seed tray dome is acceptable. Use the external probe and set the thermometer to “outside”, and that will give you an idea of what your vegetable seedlings are seeing in the way of heat. Each seed packet will tell you the best temperature for germination. We set ours around 85 degrees, and that seems to work well for most of the seeds. Soil temperature is very important for starting vegetables from seed, so you might want to pick up a soil thermometer. Since the probe of a soil thermometer is difficult to insert and hold still in a peat pellet and the small cells of sheet pots, we just measure the soil surface temperature with the outdoor probe thermometer and estimate that the temperature of the soil an inch or so below that point is a few degrees warmer. The outdoor temperature probe on the thermometer is completely sealed, so you could place it under the soil for accurate readings, however inconvenient that might be. Regardless, once you find the temperature setting that works well with your water bed heater controller, mark it so you don’t set it too high or too low.
The idea behind the water bed heaters is two-fold. First, they are large enough to hold two standard 10 inch by 20 inch seedling trays, with just a little bit overhanging the edges of the heater. Second, they put out more heat than a standard seedling heater, and that means that they can be placed inside a “seedling house” or cold frame in the winter for starting vegetables from seed.
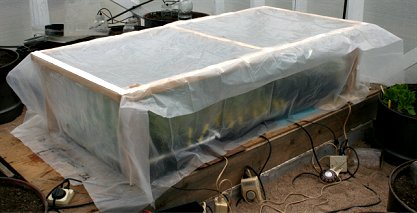
Seedling House
A seedling house provides nice above ground heat for vegetable seedlings while they get natural outside light to promote good growth without allowing them to become leggy. A seedling house is any structure that allows you to place the seedling trays and domes within it. It can be a cold frame, a frame with plastic sheeting for a top and sides, or a tunnel or row cover within a greenhouse. The idea is to create an environment for starting vegetables from seed that is not prone to the chilling and drying effects of the wind. It has to retain most of the heat that you provide within it, and it also has to allow light to enter freely to heat up the environment like a greenhouse. This gives the vegetable seedlings a nice place in the sun and a warm spot for those cold and long winter nights.
I like the idea of starting vegetables from seed in a small portion of the greenhouse dedicated to vegetable seedlings. This is especially appealing if that same area can later be used for other purposes. This means you are starting vegetables from seed out where you are going to plant them, and this keeps the mess out of the house.
You can of course have a separate seedling house so that you have the business of potting soil and trays and pots and pellets off in a separate area that doesn’t interfere with areas meant for hoes and rakes and shovels. Suit yourself when it comes to this, but if you are like many, space is at a premium and materials are costly, so you might want to have your area for starting vegetables from seed also be a part of your area for growing the vegetable seedlings after you transplant them.
Keep Good Records
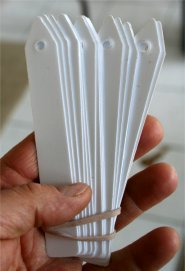
We have learned to keep good track of what we plant. Vegetable seedlings of the same type look alike and you can’t tell one cucumber from the next until you have fruit. To make certain we know what we have growing, we use labels and markers. The labels are self-stick, and we affix them right to the markers. Moisture tends to warp and lift the labels, but they last long enough for you to get to know what you have planted in the garden beds. After that, you might want to use a more informative marker.
Our larger plant identification markers are laminated to minimize damage from moisture, and they offer sufficient information for reference throughout the season. A key piece of information for us is the number of days until harvest. The markers also have a place to record the date of transplant. Using this information, we can plan when to harvest.
Boost Germination
To help with germination, we hang fluorescent lights above the seed trays when we are starting vegetables from seed inside a building. Some plants, like lettuce, need light for germination. As the vegetable seedlings emerge, we keep an eye on them and transplant to larger containers as necessary to give them room to grow. You can use standard fluorescent light bulbs, or you can use the grow lights that are designed for raising seedlings. The grow lights cost considerably more, but provide a better spectrum of light for the plants. The key is to have the lights right on top of the vegetable seedlings so they receive the most intense light possible. If you don’t have sufficient light, the plants will get leggy and drop over.
The keys to starting vegetables from seed are moisture and warmth. The key to growing vegetable seedlings once they are started is light. If possible, put the seedlings outdoors or next to a window to catch the sun’s light without allowing them to get cold. Outside is best since having vegetable seedlings next to a window often just encourages them to lean over like they are trying to look up into the sun (which is exactly what they are trying to do). My preferred approach to starting vegetables from seed is to have the vegetable seeds in soil placed in a greenhouse or seedling house right from the start. With heater mats, a cold frame, seed tray domes, and thick blankets to cover things during the cold dark nights, the seeds will hardly know the difference.
The advantage of this approach is vegetable seedlings will receive the proper spectrum of light and the appropriate intensity of light right from the first moment they peek out to say “howdy”. They are also in just the right place for “hardening off” and if you have them in the greenhouse already, this is where they are going to live, so it is all the better in terms of convenience.
During the day, remove the insulation layer once the sun gets high enough to add heat to the plastic domes or seed house. With double plastic coverings, the seedlings can get to 130 degrees in full sun very quickly. Use your judgment as to when a layer of plastic needs to be removed to keep the seeds warm, but not hot. Wait until the plants are mature before you try cooking them. I have learned this through experience.
Starting vegetables from seed in seed trays means they will need to be transplanted into the garden. So, we need to work backwards from the expected transplant date to know when they should be started. Seed packets should give you information about when you should be starting vegetables from seed. Often they will tell you to start seeds indoors so many weeks before last frost. For example, most tomato seeds take about 6-8 weeks to sprout and reach transplant size. So if your last frost date is May 31st, you would start your tomato seeds around April 7th. On May 31st, when you are ready to plant, you should have 8 week old tomato plants ready to go. Sometimes the seed packet advice is as simple as “direct sow as soon as the soil can be worked”. In any case, you need to plan what and when you are going to plant. It’s helpful to record the date you plant the seeds, the date they germinated (and you could see the little seedling) and the date they were transplanted in the garden.
Our approach to starting vegetables from seed is to understand the time required for germination and growth of the vegetable seedlings so we can adjust the planting time to avoid the last frost dates associated with either our outdoor garden or one of the greenhouses. Since the greenhouses aren’t heated, we advance our plant dates only by about 2 weeks. The seeds are planted on dates that we believe will give us a reasonably good size plant just about the time we expect it will be safe to put it in the ground for production. Tomatoes need to be started early since they take a long time to grow and need warm weather to grow in. If you don’t start tomatoes, peppers and eggplant early, the harvest season in northern states will be short, and results will be pitiful. Check seed catalogs for specific recommendations for when you should be starting vegetables from seed in your area.
Not all vegetable seedlings are good for transplanting – some vegetables are better off if you direct seed them into warm soil in your garden. Carrots, radishes, beets, turnips and other root crops are best if they are direct seeded. Usually they grow fast and don’t need to be started early. For example, radishes take only about 30 days to mature, sometimes less. The timing for lettuce is much the same.
We keep our seedlings watered and illuminated, waiting for the day when they can be transplanted. In the past, we constructed cold frames that allowed us to put the vegetable seedlings on the porch during the day to get sunlight so they don’t get leggy. If you are starting vegetables from seed for planting into an open garden, a cold frame is almost a necessity. If you are going to use a greenhouse, then you can probably don’t need a cold frame and can just use the seed tray domes.
Clair Schwan is an experienced vegetable gardener with open sun gardening beds and three quality greenhouses of his own design and construction. He grows over 100 varieties of vegetables and provides fresh produce year-round for himself and his family.
Related Articles & Free Email Newsletter Sign Up
Environmental Consistency is a Must for Successful Plant Propagation
How to Grow Japanese Red Maple Trees from Seed
The Importance of Saving Heirloom Seeds
Subscribe to our Free Email Newsletter

Comment here