Professional growers have learned that if you can heat the soil or other growing medium without raising the air temperature around the tops of the plants, root development can be induced and or speeded. This propagation technique is used by professional propagators around the world. The same evergreens that require up to twelve months to develop roots can be successfully rooted in as little as six weeks by applying bottom heat.
The secret to using this propagation technique is to warm the soil without increasing the air temperature above the soil. In a commercial nursery the ideal situation is to maintain a soil temperature of 69-70 degrees F. and an air temperature of 40-45 degrees F.
Nurserymen use different ways to accomplish this. One of the most popular ways is to set the propagation frames on benches about 36″ high inside a greenhouse. Using a small, forced air furnace they blow the warm air under the benches. The benches have plastic or some other material around the bottom so the heat can not escape out the sides. The heat must rise through the growing medium. A special thermostat is inserted in the soil. This thermostat controls the furnace. When the soil reaches the optimum temperature, the heat is turned off until it is needed again.
Trapping the heat under the bench keeps the air temperature much lower than the soil temperature. Therefore, rooting activity can take place while the top of the cuttings remain dormant. Professional growers also use very complex systems that circulate hot water through plastic lines buried in the soil. This works well, but a second heating system is usually required to keep the air around the top of the cuttings from getting too cold.
Nurserymen are innovative people. Some of them have used regular household water heaters, installed a circulating pump, and circulated hot water through 1″ plastic piping. When you consider a hot water boiler sells for considerably more than a new household water heater, it’s easy to understand why they do this.
These systems are too complex for the typical home hobby grower. After all, we’re only interested in propagating a few cuttings or maybe a few hundred, not fifty or sixty thousand. But we can use bottom heat to increase our results and to cut down on the amount of time it takes to root our cuttings.
Although I have never used the method I am about to describe, I have a friend in the nursery business who uses it. When they build their frame for their hardwood cuttings they dig a hole the size of the frame, about two feet deep, exactly where they are going to set the frame. They pack this hole full of manure all the way up to ground level. They then set the frame over this bed of manure and fill the frame with coarse sand just as described earlier.
Through the natural process of decomposition, the manure heats up as it decomposes. This heat warms the sand in the propagating frame. Now I doubt that you will ever achieve a soil temperature of 69 degrees F., but at 45 degrees F. rooting can begin.
An easier way to create bottom heat in your propagating frame would be to purchase an electric soil warming cable kit, or a heating mat that goes under your flats. I recommend heating mats over soil warming cables. Below I describe how to use soil warming cables if you prefer, but the mats are much easier.
To install them just bury them as you fill your frame with sand. Put an inch or two of sand in your frame depending on how deep your frame is, and then lay the electric cables in the sand and place the rest of the sand on top of the cables. The cables should be about 3-4 inches down in the sand.

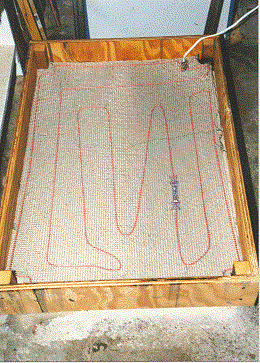
The above photo is a bottom heat propagation box with the soil warming cables in place. On the right side you can see the in-line thermostat that automatically regulates the temperature.
Make sure to buy a soil warming kit with a built-in thermostat. These thermostats are preset and can not be changed. The ideal soil temperature for rooting most cuttings is 69 degrees F.
Make sure the electric cables do not touch each other when you install them. They are insulated, but two cables touching one another could cause a short circuit. The best way to accomplish this is to buy a piece of hardware cloth (screen) the size of your propagating frame. This hardware cloth should have large holes, at least 1/4″ or more.
Lay the soil warming cables on the screen and tie them in place using string or twist ties. Do not make these ties tight. Be careful not to cut into the insulation on the wires. Once this is done, just lay the hardware cloth in the bottom of your propagating frame. Be careful when sticking cuttings or removing cuttings not to damage the soil warming cables. The thermostat is built right into the soil warming cables. It should be buried in the sand. Make sure the thermostat is not right up against a cable. Placing the thermostat too close to a cable will give it a false reading and the proper soil temperature will not be maintained. The soil warming cable kit that you purchase will come with instructions. Make sure to read them carefully.
Mike McGroarty is the owner of McGroarty Enterprises and the author of several books. You can visit his website at FreePlants.com and read his blog at MikeBackYardNursery.com.
Related Articles & Free Email Newsletter
How to Build a Simple Homemade Plant Propagation System
The Best Ways to Propagate Your Houseplants
Tips for Seed Starting Success
Subscribe to our Free Email Newsletter

Comment here