
There are many traditional methods for heating your greenhouse. When I first started greenhouse gardening I had a small 8×8 foot greenhouse. It was relatively simple to heat this tiny size with a single small electric heater that had a timer and thermostat.
Last year my husband and I added a larger lean-to greenhouse that was attached to our garage. Rather than operate both greenhouses, we decided to use the small stand alone as a storage building, and to utilize the larger 11 x 19 lean-to greenhouse for growing. I wasn’t looking forward to heating this bigger greenhouse. With the price of utilities going higher and higher, I began to look for alternatives to the traditional methods. Natural gas and electric were just too costly and I wasn’t willing to add this to my monthly budget. After all, I’m just a hobby gardener, not engaging in commercial commerce.
I’ve read many books and performed countless hours of research on greenhouse gardening over the years and have learned about gardeners that heat their greenhouses with wood burning stoves. But the “experts” always discouraged this practice. I decided to do more research. Funny thing, most of the resources I found were dated to the early 1970’s when the real “green” movement began. I was intrigued. I found pictures of wood burning stoves in greenhouses. I couldn’t tell from a photograph how expensive, how time-consuming, or how “green” this was, but it was appealing if nothing else by aesthetics alone. I had visions of sitting in front of the wood burning stove on a cold winter morning, looking out at the frozen snow on the ground all from within the warmth of the greenhouse.
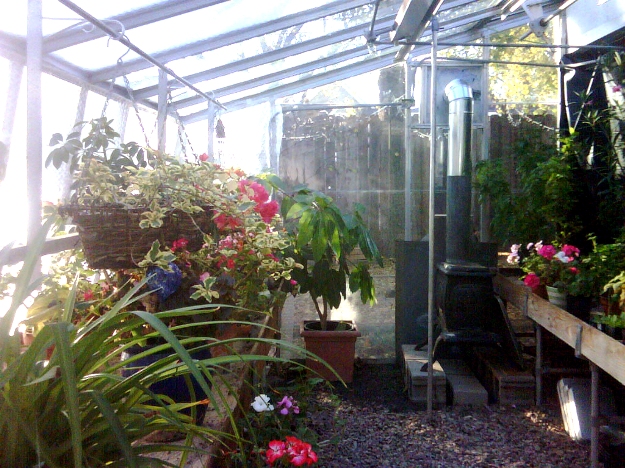
My husband is a great sport. I had to convince him that it was worth a try. I do hate paying utility bills. And he knows it. We found an old, inexpensive wood burning stove and installed it on the west end of the greenhouse. The greenhouse floor is gravel so we positioned the stove on four cinder blocks, one under each cast iron leg, making sure it was level and stable. We had to remove a pane of glass for the exhaust, and built the stack eight inches out from the glass wall. We placed large metal trays on the back and side of the stove. Since there was one wood framed bench about a foot from the stove, we wanted to make it as safe from fire as possible.
Next, we had to experiment on how to keep the fire going, while maintaining heat. Living in zone 6, we have cold winters. I try to maintain the lowest temperature at 50 degrees, and not one degree less. This is considered a “warm” greenhouse. If you have a “cool” greenhouse you would try to maintain a low temperature at 40 degrees. In comparison, a “hot” house would have a low temperature of 65 to 70. I ran the smaller greenhouse we own as a “cool” greenhouse and really wanted to try a “warm” greenhouse with this larger one. With the smaller greenhouse, my flowers and vegetables survived, but they didn’t thrive and I wanted a greenhouse where the flowers would flourish! Not just merely survive.
My husband, the hiker has a lot of experience with fire-building. He knew about different types of wood, including what not to burn (some wood throws off sparks,) other types were heavy smokers, and still others would get hot, but burn out too quickly. What we needed was wood that would get hot and burn slow. We learned that Hedge, also referred to as Osage Orange, was perfect. It is a hard wood that could be stacked in the stove that would burn slow and hot. In fact the coals would still be glowing in the morning so it exactly what we needed
The other factor that helped make this successful is that while I am a morning person, my husband is a night owl. It became a sharing opportunity, not a chore, mind you. Every evening last winter, he would go out to the greenhouse between midnight and 1:00 am and load the wood in the stove and get it blazing for the wee hours of the morning. One of the first things I would do upon rising early in the morning was to go out to the greenhouse to stoke the coals. It may sound like high maintenance, but it didn’t seem so at the time. I actually enjoy taking care of the greenhouse. Even with the little greenhouse, I would make my morning trek just to check things out, breathe the earthy scent of the soil and moisture in the air. No way was I going to just rely on my digital remote temperature gauge.
The key to making a wood burning stove work is of course having a source for wood. It could become cost prohibitive to heat a greenhouse in this manner if you had to purchase enough wood to get you through the winter and into spring, which can be five to six months worth. But if you do have a wood source then this is an option to be considered. But you must be aware of fire hazards. You certainly do not want to lose all your plants and the greenhouse too!

And I learned a few things along the way. The heat didn’t reach all the way to the east end of the greenhouse; the east end was slightly cooler than the west. Our coldest temperature last winter was two days of -17 degrees but I didn’t lose any plants. On sunny days, we didn’t need to have a fire going. On cloudy days, it would depend on the temperature, so we paid close attention to the forecast.
The tender annuals like the sweet potato vines didn’t like to be placed too close to the stove. The oleander and citrus loved being close by, as did the succulents. The plants closest to the stove would dry out faster. But overall, I was very satisfied with heating the greenhouse in this manner. It was simply wonderful to be able to sit by a cozy fire and tend to the plants in the middle of winter.
Becky Miller is a hobby greenhouse gardener who has been a passionate gardener for over twenty-five years. You can follow her adventures of creating an old-fashioned cottage garden Kansasbungalow.blogspot.com.
Related Articles & Free Email Newsletter
Cold Weather Energy Efficiency for Greenhouses
Passive Solar Heating for Greenhouse Operations
Selecting the Best Way to Heat Your Greenhouse
Subscribe to our Free Email Newsletter

Comment here