
Garlic, with its pungent aroma and versatile flavor, is a staple in many cuisines around the world. Not only is it an essential ingredient in countless dishes, but it also offers numerous health benefits. One creative and practical way to store garlic is by braiding it. One creative and practical way to store garlic is by braiding it. Braiding garlic not only keeps your garlic bulbs organized and accessible but also adds a rustic touch to your kitchen décor. In this article, we’ll guide you through the process of braiding garlic, step by step.
What You’ll Need
Fresh Garlic Bulbs: Choose bulbs that are firm and plump. Soft or moldy cloves should be discarded.
Twine or String: Use a strong twine or string that won’t break easily.
Scissors: For cutting the twine to the desired length.
Step-by-Step Guide
Step 1: Harvest and Cure the Garlic
Garlic is typically harvested when the leaves start to turn brown and die back. Carefully dig up the bulbs from the soil. Trim the Roots and Stems: Trim the roots and stems, leaving about 1 inch of stem attached to the bulb.
Step 2: Prepare the Garlic Bulbs
Choose bulbs of similar size for a neat and balanced braid. Gently remove excess dirt from the bulbs but avoid washing them as moisture can encourage mold growth.
Step 3: Begin Braiding
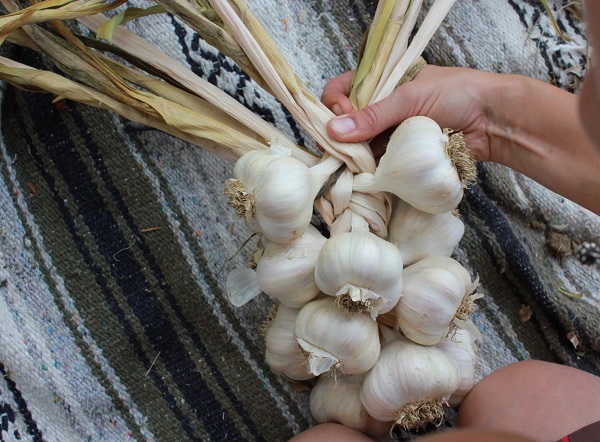
Choose three garlic bulbs of similar size. These will be the starting point of your braid. Hold the three bulbs by their stems, positioning them parallel to each other with the stem ends aligned.
Step 4: The Braiding Process

Take the right bulb and cross it over the center bulb. The right bulb will now be in the center position. Take the left bulb and cross it over the new center bulb. The left bulb is now in the center position. Take a new garlic bulb and place it to the right of the right bulb, making sure the stems align. Take the right bulb and cross it over the center bulb. This will secure the new bulb in place. Continue alternating between crossing the right and left bulbs over the center bulb, and adding new bulbs to the right, until you’ve used all your garlic bulbs.
Step 5: Finishing the Braid
Once all the garlic bulbs are incorporated into the braid, braid the stems down as far as you can comfortably reach. Secure the braid with a knot or a piece of twine, leaving enough extra twine for hanging.
Step 6: Hang and Store
Hang the garlic braid in a cool, well-ventilated area away from direct sunlight. This will help the garlic bulbs to cure and maintain their freshness. Regularly inspect the garlic braid for any signs of mold or softening. If you notice any bulbs going bad, remove them promptly to prevent spreading.
Braiding garlic not only provides a functional storage solution but also adds a touch of charm to your kitchen. With a little practice, you’ll be able to create beautiful braids that showcase your culinary skills and creativity. Enjoy the convenience of having fresh garlic at your fingertips while adding a decorative element to your kitchen space.
Related Articles & Free Email Newsletter Sign Up
Garlic is a Must for the Cook’s Garden
Garlic Should be Part of Your Winter Greenhouse Garden
Fall is the Time to Plant Garlic
Subscribe to our Free Email Newsletter

Comment here