
Vegetable Gardening isn’t Just for Summer Anymore
Now that most of your summer vegetables are growing well and many of your spring crops have provided an early harvest, let’s start thinking about how you’re going to coax some of your crops into an extended harvest this late fall and early winter. Success in this area doesn’t fall into our laps; we have to make it happen, so let’s look at the type of resources we’ll need to consider if we intend to extend our harvest – at either end of the traditional summer vegetable gardening season.
Greenhouses
I’ll let my bias show and start off with greenhouses. They’re permanent structures that give us a well defined and protected space for gardening. It’s essentially indoor gardening in the great outdoors. I like greenhouses because they allow you to establish resources like watering systems, automatic ventilation, heaters, fogging and misting systems, lighting, and power outlets that can help you operate and maintain an environment that is conducive to what you’re trying to grow.
There are many types of designs, sizes and features to choose from, so you’re likely to find something that blends with your home and still supports your interests in terms of gardening. I use unheated greenhouses with ventilation, water hydrants and electrical outlets. They meet my needs just fine and seem to be quite economical to operate.
The major advantage of greenhouses is that they’re permanent, so they can be designed to withstand strong wind, hail and critters – something that row covers simply can’t do. They’re also a structure that can be easily sealed and vented using permanent doors, windows and vents to make the job of temperature regulation much easier. In addition, they can be large and tall to offer plenty of space for gardening and plenty of comfort for the gardener.
Often, greenhouses that are unheated and manually operated do not provide a full array of features for climate control. These are sometimes called garden “tunnels.” I have friends that own and operate a high tunnel and a low tunnel. Both of their “tunnels” are permanently installed, as much as earth anchors can make a structure permanent, so I consider these to be another variation on the idea of a greenhouse.
Garden Tunnels
When I think of garden tunnels, I think of portable structures in the garden, often hoop shaped, which might be used on a temporary basis. I also think of a gardening structure that is relatively limited in size – large enough to offer comfort to the gardener and space for plants, but small enough to haul it around or pick it up and move it with a little help.
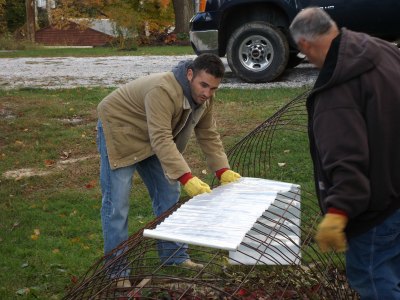
My preference would be a well constructed rigid frame that is lightweight and easy to move in and around the garden, with a separate clear plastic covering that can be applied once the framework is secured to the garden soil with stakes. Chain link fencing top rail tubing or PVC plastic piping can work well. Rebar inserted into PVC pipes can offer more strength and durability but will add considerably to the weight. Regardless of the material used, the outer surface must be smooth to minimize the possibility of snagging the clear plastic covering.
Garden tunnels can also be structures that are erected and disassembled on a seasonal basis, perhaps only used during portions of the season when plants need protection from the elements. Curved sections of rebar covered with PVC can be stuck into the ground and fastened with cross members and anchors. It’s easy to do and offers you the opportunity to create a garden tunnel of any size that suits your needs.
Whether it’s a tunnel of a fixed size or something you build on location to suit your needs, I envision draping a UV protected poly covering over the top and burying the edges of the cover with soil to hold it in place. I also envision long stakes around the edges and guyed anchors at the ends to make the structure resistant to heavy rains and wind.
Cold Frames
A small-scale device for extended season growing and harvesting is the cold frame. Unlike a greenhouse or garden tunnel, cold frames are usually low-profile enclosures of about 12 to 20 inches in height. Their shape is generally square or rectangular and limited to something on the order of 3 feet long by 5 feet wide. Often, they are portable, or at least movable, but they can also be permanently located with a nice southern exposure for optimal use as a season extender.
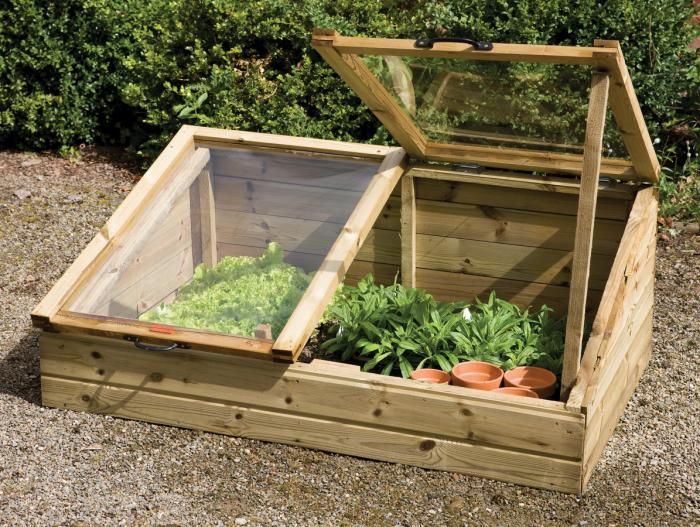
The top of a cold frame is generally slanted a bit so you can point it south to help catch more of the early and late season sunshine, and a hinged top is a typical feature. Think of a small, raised bed with high sides and a clear hinged lid and you pretty much have the idea of a cold frame.
Cold frames are well suited to starting seedlings if you have a bottom in them that allows you to place seedling trays filled with soil, and perhaps seedling heat mats as well. If your cold frame has no bottom, it can be placed over low-profile vegetable crops to offer protection from frost and cold winds as winter approaches. If you construct a taller arched top from lightweight tubing and a clear UV protected plastic covering, you can support an extended harvest of cold hardy vegetables and provide an ideal environment for heat loving summer vegetables as well.
Row Covers
The idea of simple row covers also makes my list of necessary resources for extending the vegetable gardening season. Think of row covers as a clear blanket that is placed over your low-profile crops to help capture and retain solar energy as well as natural heat from the ground. Row covers can be used outdoors if secured against the wind, but generally I find them to be of much greater value inside my unheated greenhouses.
When used inside a garden tunnel or greenhouse, row covers offer a second layer of protection from the cold by providing more resistance to heat loss. It’s a bit like putting another blanket on the bed during an especially cold night. The row cover can be draped over and supported by strong plants, or you can install hoops or other types of framework to keep the cover from coming into contact with more delicate vegetable crops.
The advantage of using clear plastic row covers is that they are effective in capturing heat from sunlight, so they generate heat beneath them much like a greenhouse does. Other types of row covers like loosely woven light colored fabrics can let in sufficient light for plants and help capture ground heat as well, but they can’t provide quite the “greenhouse effect” and protection from wind that UV treated poly coverings can.
To improve row cover effectiveness inside my greenhouses, I sometimes toss on an old bed sheet after the sun goes down to offer yet another layer of lightweight insulation if we’re expecting an especially cold night. If you supplement your row covers like this, be sure to remove the bed sheet in the morning so light is again allowed to penetrate the clear plastic and start warming up your plants.
Seedling Greenhouse
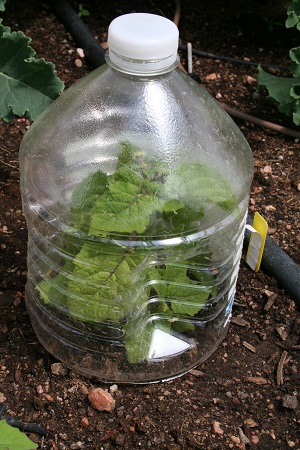
My last suggestion is a miniature seedling greenhouse for your seedlings and young plants. This is most helpful in the early spring when you’re trying to get a head start on the growing season. I use any container that will comfortably fit over the seedlings and let in light. I’ve used canning jars, gallon pickle jars, tall plastic drink glasses, and recycled plastic water and soft drink containers.
My favorite approach is to cut off the bottom of an empty and clear 2-liter soft drink bottle with its label stripped off. This allows me to seal the container around a seedling by twisting the open bottom of it into the soil a bit, and then use the screw top for watering and venting. Light gets in to heat up the seedling and water is retained right at the base of the seedling by the walls of the bottle. On especially sunny days I remove the top and allow excess heat to vent.
The idea of a miniature seedling greenhouse is to provide a protected microenvironment for your seedlings as they get a good start in the spring. It works well for me when getting an early start for just about any type of seedling. I leave the protection on during cold and overcast days and take it off during warm and sunny days. If you do this, be sure to put it back in place an hour or so before sunlight disappears so your seedlings aren’t left to fend for themselves during the cold night.
Miniature seedling greenhouses can also be used to put a cover over seedlings that you’re starting by direct seed method. I do this to offer protection from mice that love to munch on the newly sprouted plants like collards, kale, cabbage and lettuce. I leave the seedling greenhouses off during the day and put them back on in the late afternoon to offer a warmer environment throughout the night, and to protect my tender seedlings from marauding mice that like to attack in the cover of darkness.
Putting it All Together
With a bit of imagination and a little investment in resources, you’ll be ready to start experimenting with an earlier start to your vegetable garden as well as an extended harvest well into the late fall and early winter. Soon you’ll see that a few essential resources coupled with a little know-how and experience can help you prove to yourself, and your skeptical friends, that vegetable gardening isn’t just for summer anymore.
I suggest your first adventure in extended vegetable garden harvesting involve bringing cold hardy crops from late summer into early winter. Use a cold frame in the garden for low growing crops like lettuce and put a row cover over taller varieties like kale. For a longer harvest well into the winter, be prepared to use cold frames and row covers in addition to a garden tunnel or unheated greenhouse.
Be sure to focus on harvesting, not growing, and select cold tolerant and cold hardy vegetables like kale, leek, collards, cabbage and broccoli. Plant earlier enough to bring healthy and mature plants into the early winter and remember to stop watering a little bit before your first frosts. Lastly, remember to vent your plants on warm and sunny days so you don’t cook them before you’re ready to. Above all else, have fun, be bold, and enjoy the adventure as you take your plants “where no vegetable has gone before.”
Clair Schwan is an avid vegetable gardener who considers his gardens to be important assets. To him, vegetables in the garden are a bit like money in the bank.
Related Articles & Free Email Newsletter
Greenhouse Gardening – Should I Take the Plunge?
How to Create the Best Location & Orientation for Your Greenhouse
How to Pollinate an Indoor Vegetable Garden
Subscribe to our Free Email Newsletter
Comment here