September is the time of year when I’m forced to choose which of my outdoor plants can be saved from the inevitable approach of winter. If I could, I would dig up the entire garden. The reality is that I try to find room for anything that falls into the categories of heirloom, rare, or expensive. Taking cuttings is an easy, inexpensive way to propagate new plants that are genetically identical to the mother plant but take up much less space.
For most plant species, you can produce a rooted plant from a cutting long before you can start the same plant from seed, plus taking cuttings is easy. This article does a good job of explaining the benefits of taking cuttings versus growing by seed. The following are general guidelines that will work for a wide variety of popular plants.
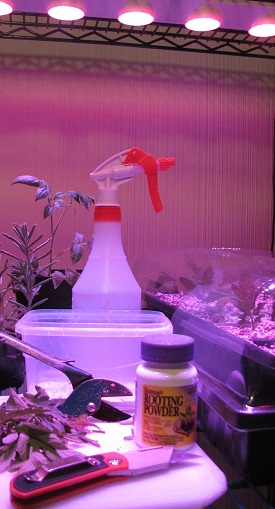
Plan to give your plants a thorough watering the night before. You’ll want to take cuttings in the morning when plants are robust. Choose a clean area to work and prepare sterile rooting containers with ample drainage. Remember that the containers will need to fit in your propagation dome or be small enough to fit in a plastic bag. A half and half mixture of sand and vermiculite or sand and perlite are both good choices for a medium. You want the rooting medium to be porous, with excellent drainage, but heavy enough to hold your cuttings upright. A liquid or powder rooting hormone will improve your success and root growth rate. Rootbark cones, rockwool, jiffy pots, and hydroponics, all offer suitable alternatives for successful rooting.
Taking a cutting requires only a little water in a plastic bag and a sharp pair of pruning shears. Choose healthy looking, non-flowering shoots and trim them to 2-8 inches beneath a node (that is where a branch or leaf meets the main stem of the plant). Remove the lower leaves to minimize transpiration. Trim the stem of longer cuttings at a diagonal making them short enough to stand on their own (a razor blade works great). Then, lightly scrape the bottom 1/2″ of the stem, before dipping the clipping in rooting hormone. Place the treated cuttings gently into prepared holes in your moistened media or rooting cube watering them in with a fine spray as you go. Next, cover the planting containers with plastic bags or propagation domes to maintain a high humidity level. You should poke a few small holes in each bag with a pencil to allow a small amount of air exchange. Finally, place the clippings to root in a warm, well-lit place. LED lighting prevents overheating, UV stress, and water loss but any well-lit area out of direct sunlight will suffice.
You’ll likely only need to water about once a week or every week and a half if you’ve placed your cuttings under LEDs, but watering frequency will increase as your clippings root and grow. Be careful not to bump the clippings while they’re rooting and visually inspect the cuttings daily. The first week of rooting is very important to your success. Watch out for too much water, but don’t let them dry out. Also, be on the lookout for mold and mildew and remove any yellow leaves as soon as you see them. Once the clippings have rooted, remove the plastic covering and your new baby plants are ready to be transplanted into a less humid environment. Your rescued plants will keep you gardening all winter long and give you an early start on spring.
Angela Lundmark is a freelance writer that enjoys outdoor and indoor gardening.
Related Articles & Free Email Newsletter Sign Up
Hydroponic Propagation is an Easy Way to Start More Plants
Plant Tissue Culture Creates a Lot of Plants at Little Expense
The Importance of Saving Heirloom Seeds
Shop for High Quality CBD Products
Subscribe to our Free Email Newsletter

Comment here