
The Mittleider grow box is a combination of soil gardening and hydroponics. It was created by Jacob Mittleider as a viable way to raise vegetables even if your soil was of poor quality. He contends that as good as hydroponics may be, just maybe there is some nutrient or element contained in soil that plants need that we have not yet identified. His method anchors plants in a growing medium held within a grow box allowing roots to penetrate the soil below so plants receive the ‘best of both worlds’, so to speak.
Advantages of the Mittleider Method
- Inexpensive
- It combines hydroponic principles with soil gardening to increase crop yield.
- Plants can be planted closer together thus increasing yield per square foot.
- It is ideal for areas where soil gardening would not work due to poor soil quality.
- A Mittleider box can be placed anywhere – I even placed one on the corner of my gravel driveway which was unsuitable for a conventional garden.
- Plants can be grown in substrate made from local materials such as smashed rocks.
This method requires a ‘box’ 8 inches high that is any length and width that has no bottom. Place this on the ground in the desired gardening spot and fill it with a mixture of perlite, peat moss, sand and saw dust. The actual composition of the medium does not matter if it drains well and stays aerated.
My Mittleider grow boxes were built from untreated pine boards that measured 6 feet long by 3 feet wide and were 7.5 inches high by 3/4 inch wide. These boxes have only sides and no bottom. After cutting them to size I screwed in 3 galvanized 1.5 inch wood deck screws into each end of the long board screwed into the short board using my trusty cordless drill.
That was it for construction. I placed them on the ground in the place I wanted them and dug down inside the boxes into the ground an inch or so.
I collected small rocks no larger than an inch in diameter and filled the grow boxes up to 2 inches from the top. On top of the stones I poured in an equal mixture of dirt, sand and peat moss with the idea that watering would eventually bring the dirt and the fertilizer I would later apply further and further down toward the plant roots.
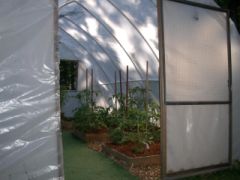
Then I planted tomato plants, 5 to a box and covered the growing medium in the box with wood chips to help keep the medium from drying out too quickly. During the season I mostly watered the plants with hydroponics nutrient solution and occasionally put small amounts of commercial garden fertilizer around the base of the plants.
Believe it or not I had 14 foot tomato plants. The tomato plants (Big Boy and Beefsteak) eventually grew to the top of the greenhouse measuring somewhere around 12 to 14 feet. The tomato yield was only average but I still consider the experiment a huge success!
In general you’ll want to place your plants in the grow medium spaced at half the recommended distance apart that is suggested for soil gardening. Each week an exacting amount of fertilizer (non-hydroponic) is added to the base of each plant for nutrients. Be careful and make sure to measure the fertilizer exactly or you will burn the roots of your plants and kill them.
Larry Maki is an avid, self-taught hydroponics gardener from Connecticut with a passion for alternative types of gardening.
Related Articles & Free Email Newsletter
Hydroponics as a Supplemental Growing Method
Required Bi-Monthly Maintenance for a Complete Hydroponics System
Subscribe to our Free Email Newsletter

Comment here